
This section of the Users’ Guide addresses track maintenance, and it’s impact upon the AlbumPlays application:
Index
- “Re-sync required before play counts may be uploaded” … what went wrong?
- re-tagging tracks
- deleting tracks
- replacing your tracks with new copies
- moving your tracks to a different location
“Re-sync required before play counts may be uploaded” … what went wrong?
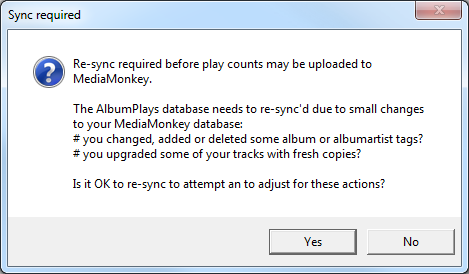
Nothing has gone wrong. AlbumPlays protects its database integrity by ensuring that it’s tracks remain linked to the master tracks in your MediaMonkey database. If it detects that something has been changed in MediaMonkey which has affected the link for one or more tracks, it throws up the above dialogue box, and suspends the uploading of new scrobbles to MediaMonkey until the links are repaired.
I say that “nothing has gone wrong” because this is an expected situation. AlbumPlays links itself to the hidden unchangeable track IDs which are a part of MediaMonkey. Most tag changes will not affect this link, however it will happen:
- if you re-assign a track or album to a different or additional albumartist tag
- if you delete a track, with MediaMonkey, replacing it with another version or copy
- if you permanently delete a track for which there is already AlbumPlays play history
- if you move a track, with some tool other than MediaMonkey, and then cause MediaMonkey to re-scan the track at its new location
AlbumPlays was designed to expect these situations, and to rejoin the link to the replacement track without consequence. Once the link is repaired there will be no loss of play history, nor any sign that this occurred. This is usually done automatically, but you may need to give AlbumPlays some assistance in unusual circumstances.
The sync check is an automatic part of the Approve action. If an out of sync condition is detected the above message is displayed. The Approve action will be unable to complete until this situation is resolved. … You should reply Yes.
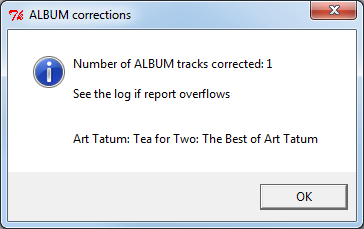
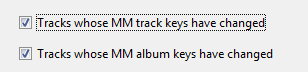
If you replied “Yes”, AlbumPlays will attempt a repair. Following the repair attempt, you will receive either one or two dialog boxes, like the one illustrated on the left. One dialog box would list any Album level changes, and the other would list any Track level changes.
Usually everything is successfully re-synced, the Approve action will complete normally.
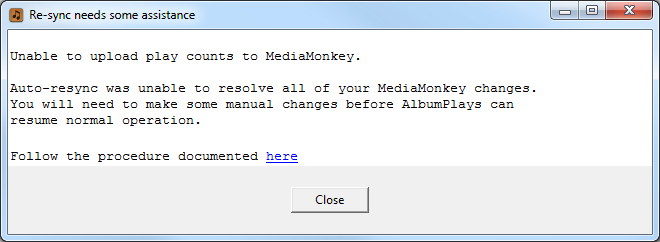
In some circumstances you may need to make some manual changes to assist the re-sync process. If this happens you will see the dialogue box illustrated on the right.
Summary:
- AlbumPlays cannot auto-resync where you have deleted a played track from MediaMonkey… you will need to also delete AlbumPlays play history for that track or album
- MediaMonkey sees AlbumArtist tag changes (artist name change, adding an additional albumartist, or removing one) as being an album replacement
- The AlbumPlays auto-resync facility relies upon tag matching … if MediaMonkey thinks that you have a replacement track or album, it resyncs by matching your most recent play history tags against the new MediaMonkey tags … you will have to assist manually if there are tag differences
The method for the repair depends upon how you triggered the break. Select one of the following causes, and then follow the associated link for “how to” info:
- you deleted a track with play history, from either from MediaMonkey or AlbumPlays
- you replaced a track, or caused MediaMonkey to re-scan the track
- you made a complex tag change by replacing an album or altering its albumartist tag, AND at the same time changed the album name tag … in this case you will need to make the album names the same, by retagging your AlbumPlays history, or by temporarily reversing your MediaMonkey album name tag change, until after AlbumPlays has handled the album replacement or albumartist tag alteration
- you replaced a track, with a new track with different tags (different title, album or artist name) … you need to retag AlbumPlays history, or the new track using MediaMonkey, making the tags the same, so that AlbumPlays can recognise the connection … once AlbumPlays has linked your play history to the new track copy, you may change to your new title or name tags using MediaMonkey
- if you did none of these things; on rare occasions I have seen MediaMonkey spontaneously replace its own record of a track or album (maybe as part of its own self-repair mechanism?) … you should treat this as if you replaced the track
collapse
Re-tagging
If you need to re-tag tracks in your collection you should do so using MediaMonkey. This will ensure that the MediaMonkey database automatically remains in-step with your track tags. This is important because your track tags are used to produce your scrobbles. Those scrobbled tags will need to be successfully matched against MediaMonkey’s version of the tags when importing scrobbles from Last.fm.
AlbumPlays also has its own database, which is independent of MediaMonkey. Track re-tagging will cause this database to become a little out of date temporarily. … You don’t need to worry about this, as it will correct itself over time.
If see the “Re-sync required …” message (discussed above) you may need to re-tag your AlbumPlays history. Open the following closed section for more details about this condition, and for further explanation upon the subject of tag synchronisation.
Why does this application has its own database?
The reason is to minimise coupling between AlbumPlays and MediaMonkey; allowing you to take upgrade versions of MediaMonkey independent of any AlbumPlays consideration, and vice versa. It also keeps open the possibility of porting this application across to other music databases in the future.
You say that it doesn’t matter that this applications gets out of step?
It is usually optional whether you update AlbumPlays’ database with your new tag values. They will be automatically reset to the correct current values when the track is next played. The discrepancy does not cause mismatches when you import fresh scrobbles, as the match up is achieved using the current values in your MediaMonkey database.
The key requirement is that MediaMonkey remains in synchronisation with the tags in your music tracks. You best achieve this by using MediaMonkey to do all track re tagging.
There are a couple of minor things which are affected by the temporary lack of synchronisation:
- the main one is that it can temporarily impair the facility which automatically transfers your play history across to new tracks, when you have upgraded to new copies (eg. you buy a remastered copy of an album for which you already have play history).
If you get the “Re-sync required …” message (illustrated and discussed above) it means that the databases need to be re-synced before can be used.
The procedure to transfer your play history to the new tracks is described here. That procedure depends upon tag synchronisation between the AlbumPlays and MediaMonkey databases. The procedure will fail to clear the “Unable to upload..” message it the tags are not in sync.
If this happens you will need to manually alter either your MediaMonkey tags, or your AlbumPlays tags, to allow the transfer proceure recognise the replacement tracks. Run the audit reports (as described here) to identify which tracks are affected. Then compare MediaMonkey to the audit reports to identify the tag differences.
If you prefer your prior tags, use MediaMonkey to re-tag your tracks. … Or if you prefer the current MediaMonkey tags you need to retag your AlbumPlays history as described below.
Once you have made the tags equal again, you need to rerun the auto-sync transfer facility again.
How to manually update AlbumPlay’s history tag values
You may try to re-synchronise the whole database by running the Action|SynchroniseTrackTags menu item; this resets all of the tags in the AlbumPlays database to the current values of your MediaMonkey database
Or you can use the Edit|PlayHistory menu item to manually update the tag for a single album or track; this doesn’t change your track or MediaMonkey tags, it just updates AlbumPlay’s database.

collapse
Things to be generally aware of:
- before doing any track maintenance it is best if you do not have a batch of fresh scrobbles still being processed. The AlbumPlays GUI should be positioned at the Get action
- there will be no disjoint in your MediaMonkey database play statistics when you retag tracks. MediaMonkey will display your new tags, and your fresh scrobbles will be united with your previous plays … however Last.fm has no facility allowing you to re-tag its version of your scrobble history, so once you start scrobbling with a changed tag your Last.fm charts and history displays will be disjointed (ie. historic scrobbles will displayed under the old values, and your future scrobbles will begin a new set of statistics under the new values)
- Sonos owners: when using AlbumPlays in Spy mode, AlbumPlays observes your Sonos zones to get the details of tracks being played, so there is no requirement for tag matching during the Get|Approve cycle. However you still should use MediaMonkey to do any re-tagging, as tag matching is required for any non-Sonos scrobbles imported from LFM … Also, MediaMonkey will degrade in value if it gets out of synchronisation with your tracks.
Deleting tracks or album
If you delete a track from MediaMonkey, one which already has history in AlbumPlays, you will also need to update the AlbumPlays database.
When you next run an Approve action, AlbumPlays will detect that the database is out of synch, as illustrated on the left.
As the auto-re-synch facility does not handle track deletions, you will need to approve these by re-syncing manually.
The Approve action will not run to completion, and the batch of fresh scrobbles will be suspended. You need to delete the AlbumPlays history for the track(s) which you deleted from MediaMonkey before you can continue.
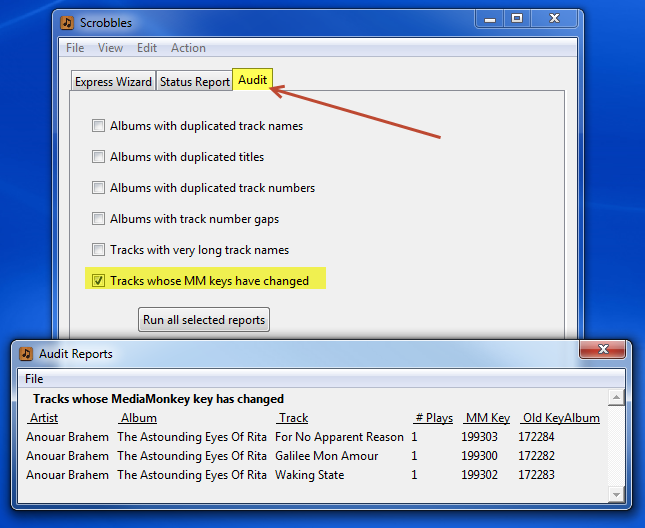
Run the Audit report shown in this illustration. The Audit Reports are accessible by clicking on the GUI’s Audit tab.
The report will list missing tracks or albums, or ones which have been replaced with new versions.
If you:
- deleted the track(s) (ie. didn’t replace with new copies)
- and you used MediaMonkey to do this (ie. did not use the Windows Explorer or some other tool)
- and the deleted track(s) had some play history
Then you will also need to delete them from AlbumPlays via the the Edit|PlayHistory menu item as illustrated below.
Or, if you have replaced the track with a new copy you need to go here instead.

AlbumPlays’ Approve action will not be able to proceed until you have resolved this issue.
collapse
nb: if you deleted the track itself, using the Windows Explorer or some other tool, neither MediaMonkey, nor AlbumPlays, will notice that it is missing, so there is nothing you need do until such time when MediaMonkey notices the dead track link(s). … but it is best if you use MediaMonkey for all deleting and re-tagging operations, as this will automatically keep your MediaMonkey database synchronised with your music collection, and you also get to complete house-keeping while your actions are fresh in your mind. … You delete tracks via MediaMonkey by selecting the track(s), and then using Remove from the right click menu. You have the option to delete the track just from MediaMonkey, or to delete the music track(s) also.

Replacing tracks or albums with new copies
If you use MediaMonkey to replace an album or track, with a new version (re-mastered, or a re-ripped copy, etc), you will need to allow AlbumPlays to adjust itself if the track already had some play history. nb: if you use Windows Explorer to replace the track, into the same directory, with a track with exactly the same file name and track tags, then neither MediaMonkey nor AlbumPlays will notice. This is an error prone procedure, and you are advised to avoid doing this.
AlbumPlays will notice MediaMonkey track replacements when you next run the Approve action. It will do this whether or not the fresh batch of scrobbles includes any of the replaced tracks. You will see the “Re-sync required” dialogue box (as illustrated at the top of the Deleting Tracks section above).
There are considerations regarding track replacements; these affect both MediaMonkey, and also AlbumPlays.
Replacement: impacts upon AlbumPlays
AlbumPlays will need attention if the track replacement has been noticed by MediaMonkey. AlbumPlays will still be connected to the old MediaMonkey tracks, and needs to transfer its prior play history across to your new tracks.
This re-sync adjust will be automatic if the new copies have exactly the same tags as those tracks which were there before. If the tags are different it will appear as a deletion, and then the addition of some new unrelated tracks. In most cases cases the tag values will be identical as they are obtained from the Internet when you ripped each copy of the album. … If there are differences it is easily handles as described below.
Firstly allow AlbumPlays to try transfering your play history using its automated mechanism. Run the Action|FixTracks and Action|FixAlbumKeys menu items, or just run an Approve action from the regular processing cycle, which will do the same thing. Where the new track tags are identical, the history will automatically transfer. There are confirmation dialogue boxes summarising how many track or album links where fixed. The process is as described here.
After the transfer you should now re-run the “Approve” action.
Then run these two audit reports … The audit reports are on the Audit tab. Run them both together. They will list any tracks which did not transfer.
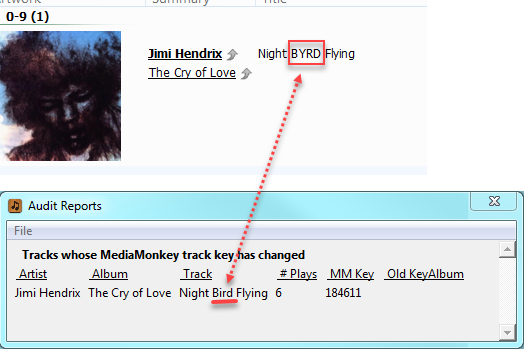
For this illustration I have replaced a track titled “Night Bird Flying”, with one tagged as “Night BYRD Flying”. … The Audit Report has only detected that the original track is missing. … AlbumPlays is not yet aware of the replacement copy because it has not yet been played, so there is no play history. … The automated re-sync facility did not link the old play history to the new track, because of the tag difference.
This is fixed by making the tags identical (track title, album title and AlbumArtist tag). … Either change either the new tags using MediaMonkey, or the old ones using AlbumPlays’** Edit|PlayHistory menu item as shown here.
Rerun the Action|Fix… menu items, or the Approve action. Then rerun the audit reports. The reports should run without listing any tracks.
Impacts upon MediaMonkey (and Sonos)
If you wish to have both track versions available, make sure that use a different album (and|or track) tag name for the new version. In this case there is nothing further to do. You will end up with both versions in MediaMonkey, and AlbumPlays will maintain independent play history for each .
If you want just the newest version, you should use MediaMonkey to perform the deletion, as it will perform the physical track deletion as well as also updating itself, keeping your track collection and MediaMonkey database in synchronisation – take option Remove from the right click menu, and then “Delete from Library and Computer”


If you want to keep offline safe copies of the old tracks as a precaution, you could move them to another location with the Windows Explorer and do the deletion (aka Removal) in MediaMonkey, using the “Delete from Library only” radio button.
Then add the replacement version into MediaMonkey using same procedure that you usually use to enrol new tracks (File|AddRescan is what I use)
Sonos Owners: Remember to also trigger a Music Library update using a Sonos controller.
collapse
nb: On rare occasions MediaMonkey itself seems to spontaneously create replacement versions of tracks or albums, maybe something triggered by its internal house-keeping or error recovery. AlbumPlays will detect this, and will require the above procedure before you can proceed.
For Sonos owners It is important that you remove the replaced track copies, as Sonos will only index a single entry for each unique tag set. If your Sonos finds duplicates, it will randomly select one of the copies, so you won’t have any control, nor knowledge, of whether you are using the old or the new version.
Moving your music
If you need to move your tracks to a new location you avoid having to delete, and then re-add them back into MediaMonkey.
The reason for this is that the AlbumPlays database is an extension to the MediaMonkey database. These two databases are kept in synchronisation via hidden fixed keys, stored inside each track and album in MediaMonkey. If you delete and then re-add material into MediaMonkey, it will be assigned different hidden fixed keys, and this will break the synchronisation between the two databases.
AlbumPlays does contain a facility to rebuild the connection (as described in the Replacing Tracks section) but it is best to not break the connections in the first place.
If you follow the recommended procedure, nothing will be broken, and there will nothing to fix.
The recommended procedure to handle track or album relocations is to either:
- use MediaMonkey to move the material
- or use Windows Explorer, and then use MediaMonkey to rebuild the connections
Relocate using MediaMonkey
- use the Windows Explorer to create any new directories that are required at the new location
- then open the source and target nodes in MediaMonkey’s Media tree as illustrated below
- drag the material to the new location
- if you drag all of the music material from the target location, MediaMonkey will offer to also relocate any other files in the source directory (album art, playlists, etc)
* 
Relocate using Windows Explorer
- drag the files or folders their new location using Windows Explorer
- then open MediaMonkey’s Dead Links node in the Media Tree at Music|FilesToEdit

- MediaMonkey will parse the database, and identify all tracks which are no longer found at their last known location
- missing files will be listed; select the albums or tracks that you moved
- then use MediaMonkey’s File|LocateMissing/MovedFiles menu option
- specify the top level directory of their new location; MediaMonkey will search within
- once the tracks are found, press Update to modify MediaMonkey with the new track locations

- NB: MediaMonkey has an optional File Monitor facility, which watches directories that you specify, to detect and respond to additions, movements or deletions. If you are doing a significant restructure if is probably a good idea to turn the File Monitor off to avoid confusion.


collapse
next step: Housekeeping: play history
back to top: LFM mode index
back to top: SPY mode index