
This page covers the AlbumPlays installation wizard, which handles the initial configuration for your environment.
Start AlbumPlays using the Scrobbles shortcut which was created during the Installation step. AlbumPlays will detect that it has not yet been configured, and will automatically go into initial set up mode.
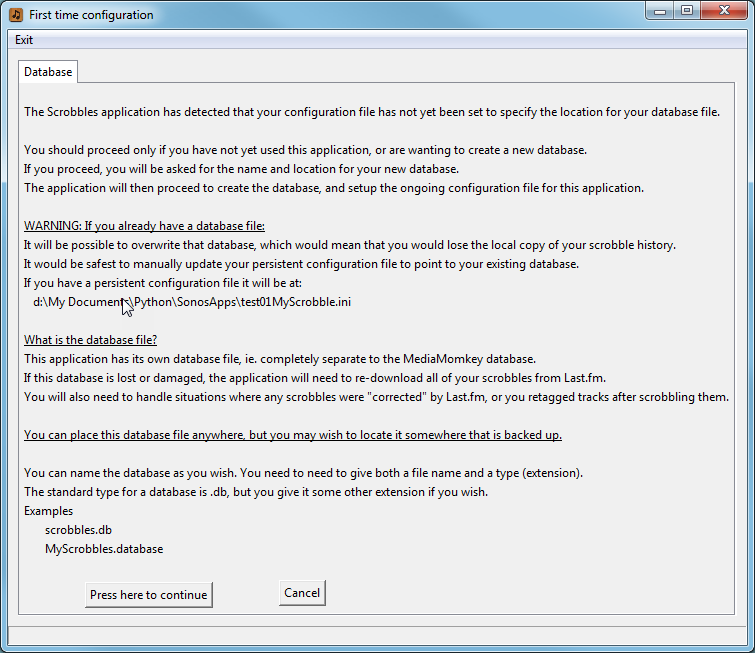
The first run will:
- create your configuration file, which is named MyScrobble.ini
- create your database; AlbumPlays has it’s own database, which is additional to your MediaMonkey database
- enrol yourself as an AlbumPlays Listener in the AlbumPlays database
Questions which are asked during this set up phase:
-
choose an location and name for your database.
If the database becomes lost or damaged, you will need to re-import all of your historic scrobbles from Last.fm, which can be a lot of work. You can store this database anywhere on your PC, but you may wish to store it somewhere which is backed up. You could store it on your NAS, but the application will almost certainly run more efficiently if the database is on your PC. -
optionally select a path on your NAS (or your PC), which AlbumPlays may write to. (NB: AlbumPlays does not require that you have a NAS).
This optional path is most relevant if you are a Sonos owner running in Spy mode, but is also useful if you want to have access to AlbumPlays-produced playlists when your PC is powered off. If you skip this step you may select a path later, where it is the known as the _nas_path option. -
provide an internal ID for yourself, and also supply your Last.fm account name.
The internal ID can be anything, such as your initials. Your Last.fm account name is needed so that the application can download your scrobbles from Last.fm; either while seeding your database, or on an ongoing basis to obtain your fresh scrobbles.
You must provide the name of a valid Last.fm account. You do not need to provide the account password, although the password will be required later if you want AlbumPlays to take over the scrobbling task from a Sonos system.
The application will be set up using default options:
-
The application will be set to get scrobbles FROM Last.fm.
ie. the application will not be observing any Sonos unit you may own. It will not be scrobbling TO Last.fm -
Communication from Last.fm will initially be throttled back to just a couple of hundred scrobbles at a time.
It is throttled back until you have verified that everything is working as expected. When you begin seeding your database you can remove this restriction, as described later. -
It is assumed that you are running MediaMonkey version 4, and that you have not relocated your MediaMonkey database away from its default location
See the FAQ if you are running version 3 of MediaMonkey, or have moved your MediaMonkey database to a custom location. -
It assumes that you want to start seeding your database using your eldest scrobbles held at Last.fm. If you would prefer another option you need to manually alter the configuration as described in above link.
The application will confirm that the database and configuration files have been successfully created by showing that you have been enrolled into the system

You can now verify that communication with Last.fm is functional. Select “Get”, and press the “Run” button to download your 1st batch of scrobbles from Last.fm.
This will open a window displaying the run log from the GET process. The log will turn black when the process is complete, and a pop-up dialogue box will be displayed. If the dialog box includes the “i” info icon from Windows, everything is happy.

Next step: Seed your database from your Last.fm scrobbles.
The configuration file:
- is named MyScrobbles.ini
- a shortcut to it was created by the Installation step
- once created, the ini file is not updated by this application. Nor is it overwritten by any any subsequent re-installation of this application.
This means that any alterations that you make to this file will be persistent. It also means that it is your responsibility to update this file if any future versions of this application require that it be changed. - see here to read more information about the configuration of AlbumPlays
- a shortcut was also created pointing to the “Configuration Documentation” file, which will be refreshed by any subsequent application upgrade. This file describes all of the ini options. You don’t need to read that file unless you want to investigate advanced or non-standard options.
Re-running this initial configuration step:
- you can re-run this step if you wish to re-create your database (ie. start again from nothing), or you wish to create a parallel database for some testing purpose
- you just need to hide (rename) the ini file mentioned above, or comment out the “_database” line in your ini file
- take great care; if you re-specify the name of your existing database, you could easily overwrite it
Next step: Seed your database with your play history.