AlbumPlays2 – first time install
This page describes how to install AlbumPlays 2 (aka AP2) for the first time.
– if you are wanting to install an update to an existing AP2 installation, go the upgrade instructions
Examples and illustrations in the following steps are written assuming a person named Matthew is going to install AP2 in the folder at F:Test_AP_LFM
The installation procedure requires use of the Windows Command Prompt facility. If you are unfamiliar with this facility there is some assistance here
Here is a brief summary of the commands used to install AlbumPlays
Installation Steps
- Install either Python version 10 or 11 onto your PC
python.org/downloads
- Add a required module to Python
Open the Windows Command Prompt facility, copy in the following command, and press the Enter key
Close the Command Prompt window after the command has been processedpip install pyqt5 - Create a new folder to hold AP data.
By default this folder will contain:- the AP application
- your AP configuration files
- your AP database file
- and AP log files required for any problem solving
So you may want to create that folder in some place which is covered by any backup routine that you have setup for your PC. The size of the contents will be around 400mb, excluding your database, the size of which is dependent upon the size of your music library and your play history
- Copy the supplied files into the folder that you created:
Supplied files- albumplays-1.1.xxx-py3-none-any.whl which is the AlbumPlays install file, and the xxx will the current release number
- invoke_albumplays.bat which is the command to open the Virtual Environment and start the AlbumPlays application within that environment
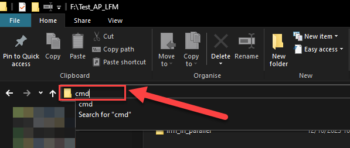
- Open a Windows Command Prompt window, and navigate into that folder. Easiest achieved as described here
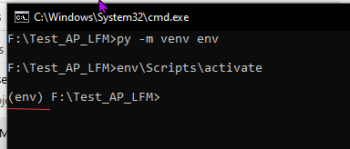
- Create a virtual environment, within which AP will run … Achieve this by copying the following into the Command Prompt window that you have opened. After pressing Enter there is a small delay while the environment is built.
py -m venv env

NB: the aim of the Virtual Environment is to isolate AlbumPlays from other applications and activities running on your PC. This makes installation less complex for yourself, and removes the cause of a lot of conflicts and environmental issues which can cause problems for AlbumPlays. It also protects other applications on your computer from being disturbed by the AlbumPlays set up.
- Activate the Virtual Environment
Copy the following into the Command Prompt window, and then press Enter:env\Scripts\activate -
Verify … The command line should now be prefixed by (env), which indicates that the Virtual Environment is running
- Prepare to install AlbumPlays2 and required modules into the Virtual Environment. First apply any updates and fixes to the Python installer. Copy the following into the Command Prompt window, then press Enter, and wait until the command completes:
python.exe -m pip install --upgrade pip - Now install AlbumPlays. Copy the following into the Command Prompt window, where xxx is the AlbumPlays release number from the name of the suppled .whl file. replace the xxx with the current release number, then press Enter to run the command:
pip install albumplays-1.1.xxx-py3-none-any.whl - Now deactivate the Virtual Environment
Copy the following into the Command Prompt window, and then press Enterdeactivate -
Verify
The command line should lose the (env) prefix, which indicates that the Virtual Environment is deactivated -
Start AlbumPlays
Copy the following into the Command Prompt window, and then press Enter
invoke_albumplays.bat -
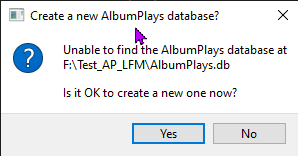
The above step will open the Virtual Environment, and start the AlbumPlays application. The following confirmation message will be displayed.
Answer YES. -
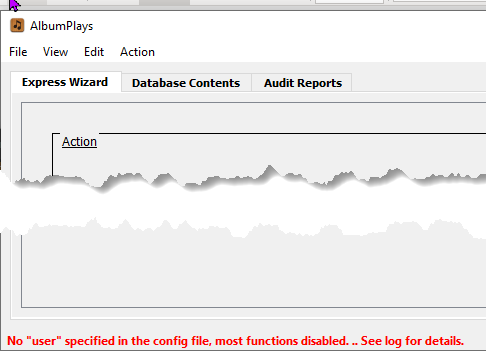
The aim of this first opening of AlbumPlays was just to trigger it to build some folders and files that it requires. The created objects include the AlbumPlays configuration file and an empty database file. There may be an error message saying “No User specified in the config file, most functions disabled.”
-
AlbumPlays has done its first run initialisation, which will have created the template for your configuration file.
You now need to set your own initial specific configuration options, and copy across your database file from AlbumPlays1 if you are migrating.
-
Close AlbumPlays, and then close the Command Prompt, window via the normal Windows X in the top right corners.
-
If you are migrating from AlbumPlays1, supply a copy of your AlbumPlays1 database
If you are migrating from AlbumPlays1:
– copy your database into the folder that you created during step #3. It is OK to replace the AlbumPlays.db file that has been created for you
– if your AP1 database has a different name, you should delete the empty AlbumPlays.db file which was created -
The AlbumPlays configuration file
The file is stored in yaml format which is relatively easy to read
– the configuration file is at “config\albumplays.yaml” within the folder you created
– it can be opened and edited by Windows Notepad, but the free yaml editor Notepad++ will give a colour coded editor which differentiates documentation from command lines, and also allows you to navigate the hierarchical yaml format more easily
– we will only be making minor adjustments at the moment, so I suggest you just use Windows Notepad at this stage
– the currently active commands are the 20 lines at the top of the contig file; the remainder is just documentation … ie. Everything from “############ DOCUMENTATION: #######” can be ignored
– any lines starting with an # are just documentation
– nesting is significant, eg. The indent between “Locations” and “default_locations” option lines is meaningful -
Update the configuration file
Review the following items:
– user: identify yourself here … eg User: Matthew … use only only alphabetic characters and maybe numbers for your, but no embedded blanks … If you are migrating your previous AP database you must retain the same User ID that you used in AlbumPlays 1
– Location>default_location: this is set to ../ which points to folder you originally created … Leave this option unaltered
– Location>albumplays_database: if you are not migrating from AlbumPlays1, you can leave this option unaltered. … If you are migrating you will have already copied across your AlbumPlays database in an earlier step. Enter that file name here .. eg. albumplays_database: AlbumPlays.db
– Location>mm_database: If you are just evaluating AlbumPlays, copy your MediaMonkey5 database into the folder that you ordinally created in step #2. .. eg. mm_database: MM5.db .. Once you have decided to use AlbumPlays this option should have the full path of MediaMonkey database. -
Save your changes to the configuration file
-
Create a desktop shortcut to use to start the AlbumPlays application
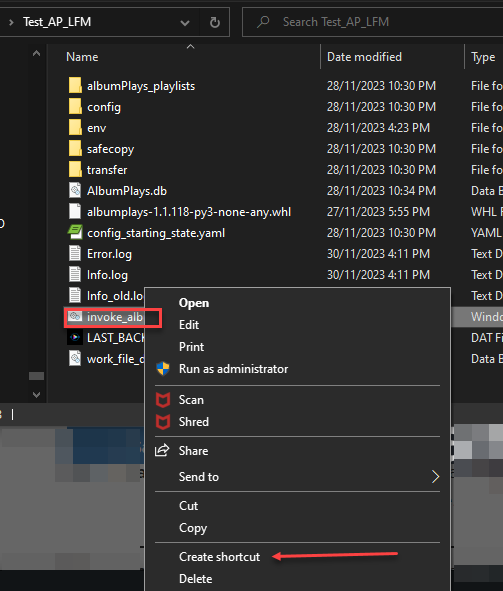
– Use the Windows Explorer, open the folder that you created, and right click the invoke_albumplays.bat file
– Select the Create Shortcut option
– Rename the shortcut to something simple like Start AP
– Drag the shortcut onto your Windows desktop -
Restart AlbumPlays using your new desktop shortcut
nb. The shortcut will automatically open the Virtual Environment that AlbumPlays runs within -
If you ARE NOT migrating from AlbumPlays 1 Database, you will need to provide your Last.fm account ID:
– take menu option Edit>Listeners
– click in the User ID that has been created for you using the User ID that you provided in the configuration file
– click the Edit option in the toolbar
– supply your LFM Account name
– set the “Mostly Plays” option to either Whole Albums, or Mixed Track
– click Save in the toolbar
Summary of Commands Used
nb. the blue lines are used within the Virtual Environment.
pip install pyqt5
py -m venv env
env\Scripts\activate
    python.exe -m pip install --upgrade pip

    pip install albumplays-1.1.xxx-py3-none-any.whl

    deactivate
invoke_albumplays.bat
Using Windows Command Prompt facility
The Command Prompt facility allows entry of the commands used to setup the AlbumPlays environment.
In most instances you will need to open the Command Prompt facility and have it positioned inside a specific folder location. This is easiest achieved via:
– open the folder in Windows File Explorer
– click inside the location bar, and then type “cmd” without the quotes
Or you may open the Command Prompt facility via the following steps:
– press Windows logo key
– then type the letters “cmd” without the quotes
– press Enter key
– then use to the cd command to position folder focus if required
Windows also has the PowerShell which could be used instead of the Command Prompt facility, but you would need to move it out of Restricted mode.
