AlbumPlays2 – install an application upgrade
This page describes how to install an upgrade to AlbumPlays 2.
– if you are wanting to install AlbumPlays for the first time, go to the first time install procedure
Examples and illustrations in the following steps are written assuming AlbumPlays was installed at F:Test_AP_LFM
The installation procedure requires use of the Windows Command Prompt facility. If you are unfamiliar with this facility there is some assistance here
Here is a brief summary list of the commands used to install AlbumPlays
Prerequisites
- Python and AlbumPlays version 2 must already be installed on your computer
- you must have already run all of the first time installation steps for AlbumPlays 2. These steps will have created the virtual environment where AlbumPlays runs, and will have created the AlbumPlays database
What is upgraded? What is preserved?
The upgrade process just applies enhancements and corrections to AlbumPlays behaviour and builtin instruction help and hints.
the following items are not affected:
- your configuration file is not affected
- the contents of your AP database is not affected, although there may be structural changes to enable new capabilities .. your data is safe
- your AP backups are not affected
- your playlists are not affected
- there is no change to MediaMonkey
Upgrade Steps
- Take a note of the AlbumPlays release number that you will be upgrading FROM.
The release number is in the form 1.1.xxx … You are looking for the xxx number- Either open AlbumPlays, then take option “File>Logs>Display info log” … The Release Number is about 20 lines from the top of the log, following the line which says “====== Run Environment======”
- Or open the folder that you installed AlbumPlays into (see step #3 of the first time install procedure) … look for the file whose name looks similar to “albumplays-1.1.xxx-py3-none-any.whl” … You are looking for the “xxx” number from that file name
- Copy the supplied file or files into the folder that you created for AlbumPlays (see step #3 of the first time install procedure).
Supplied files- albumplays-1.1.xxx-py3-none-any.whl which is the AlbumPlays upgrade file, and the xxx will the new release number
- invoke_albumplays.bat if supplied, this will be an upgrade to the command which opens the Virtual Environment and starts the AlbumPlays application within that environment
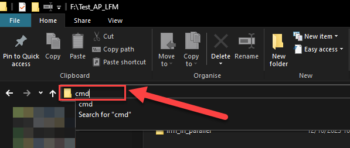
- Open a Windows Command Prompt window, and navigate into that folder. Easiest achieved as described here
- Activate the Virtual Environment
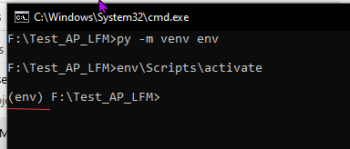
Copy the following into the Command Prompt window, and then press Enter:env\Scripts\activate -
Verify … The command line should now be prefixed by (env), which indicates that the Virtual Environment is running
- Prepare to install the upgrade to AlbumPlays2. First apply any updates and fixes to the Python installer. Copy the following into the Command Prompt window, then press Enter, and wait until the command completes:
python.exe -m pip install --upgrade pip - Uninstall the version that you will be upgrading. Copy the following into the Command Prompt window. Replace the xxx with the old release number that you recorded in step #1. Then press Enter to run the command:
pip uninstall albumplays-1.1.xxx-py3-none-any.whl - Now install the new version of AlbumPlays.
Copy the following into the Command Prompt window, where xxx is the new AlbumPlays release number from the name of the suppled .whl file mentioned in step #2. Replace the xxx with the current release number, then press Enter to run the command:pip install albumplays-1.1.xxx-py3-none-any.whl - Now deactivate the Virtual Environment
Copy the following into the Command Prompt window, and then press Enterdeactivate -
Verify
The command line should lose the (env) prefix, which indicates that the Virtual Environment is deactivated -
Delete the old install file for the previous version that you have just replaced
Use the Windows File Explorer. The file is named “albumplays-1.1.xxx-py3-none-any.whl”, where the xxx is the release number that you made note of during step #1 of this procedure
-
Start the upgraded version of AlbumPlays 2
Using the normal desktop shortcut
Summary of Commands Used
nb. the blue lines are used within the Virtual Environment.
env\Scripts\activate
    python.exe -m pip install --upgrade pip

    pip uninstall albumplays-1.1.xxx-py3-none-any.whl

    pip install albumplays-1.1.xxx-py3-none-any.whl

    deactivate
Using Windows Command Prompt facility
The Command Prompt facility allows entry of the commands used to setup the AlbumPlays environment.
In most instances you will need to open the Command Prompt facility and have it positioned inside a specific folder location. This is easiest achieved via:
– open the folder in Windows File Explorer
– click inside the location bar, and then type “cmd” without the quotes
Or you may open the Command Prompt facility via the following steps:
– press Windows logo key
– then type the letters “cmd” without the quotes
– press Enter key
– then use to the cd command to position folder focus if required
Windows also has the PowerShell which could be used instead of the Command Prompt facility, but you would need to move it out of Restricted mode.


