The intent behind the USB target for AlbumPlays playlists, is for use with a portable USB or WiFi hard drive
- either a standard USB hard drive, which can be used with a PC while away from home
- or a USB|WiFi drive, which can be used with any PC, tablet or mobile phone
- there are 2tb and 3tb models, which could accommodate even the largest music collection
- the portable drive means that you can say goodbye to trying squeeze small subsets of fresh tracks onto your mobile device, as you can now travel with your whole collection
- and AlbumPlays will translate your MediaMonkey playlists for use on this drive, and publish then directly onto the drive, or into your Dropbox library
For other options, and more background, see my blog article titled “Want your whole music collection available when travelling?“
Index:
- Preparation
- Copy, or refresh, your collection onto the USB drive
- Configure AlbumPlays for a USB playlist target
- Divert the playlist to Dropbox
- Dropbox authentication
- USB advice & hints
Preparation
You firstly need to check that your music collection is arranged in a folder structure which is suitable for AlbumPlays’ USB playlist target facility. You do this by checking whether there is a common root path for the tracks that you wish to copy to your USB drive.
AlbumPlays’ facility to translate playlists for use on a portable hard drive relies upon you having a common root path structure for all your music on your primary disk drive. I illustrate this with an example. Bill and Mary have their music stored on their computer as follows:
C:\Users\Public\Music\Bill\A tribe Called Quest
C:\Users\Public\Music\Bill\Albert King
C:\Users\Public\Music\Mary\Abba
C:\Users\Public\Music\Mary\Adele
Let us call the bold part, the root.
There is a common root for all tracks on these albums, meaning that AlbumPlays can translate playlists entries for tracks on these albums.
Alternatively, the following NAS based track path structure would also be OK for the same reason:
\MyNas\Music\Bill\A tribe Called Quest
\MyNas\Music\Bill\Albert King
\MyNas\Music\Mary\Abba
But the following path structure would not be OK. AlbumPlays would be able to handle either Bill’s music or Mary’s, but not both, as there is no common path root, unless you copied everything all the way down to C:\Users
C:\Users\Bill\Music\A tribe Called Quest
C:\Users\Bill\Music\Albert King
C:\Users\Mary\Music\Abba
C:\Users\Mary\Music\Adele
There would also be a problem with additional track locations, like:
D:\My Other Music\Bill\A.A Bondy
The reason for this restriction is because AlbumPlays has to recognise, and replace, the root of tracks like:
C:\Users\Public\Music\Bill\A tribe Called Quest
C:\Users\Public\Music\Mary\Adele
to make the track paths that your mobile device will find on your USB drive, like these for example:
\192.168.60.1\Public\MyMusic\Bill\A tribe Called Quest
\192.168.60.1\Public\MyMusic\Mary\Adele
The current version of AlbumPlays can only translate for a single path root.
collapse
Copy, or refresh, your collection onto the USB drive
If your music tracks are on a NAS, it is best to sync your music to the WiFi drive using the backup facility that is part of your NAS, .
- you will have less impact on your PC & home network if the NAS runs the sync, while it has the portable drive direct connected via a USB cable
- plug the drive into a USB port on the NAS
- sign into the NAS using your PC browser
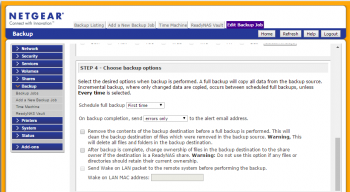
- configure a task to backup your music share to the attached drive. Specify an incremental backup, ie. each successive backup copies only new and changed tracks
- the UI for this will be different for each NAS vendor; here is an illustration from my NAS
- the initial backup will run for a long time. Mine ran overnight, as I only have slow USB 2 ports on my NAS. (the USB 2 port runs at 480 MB/s; if your NAS has USB 3 ports they should run at 5 Gb/s)
- subsequent copies will be much faster, as they will just copy new or changed tracks
collapse
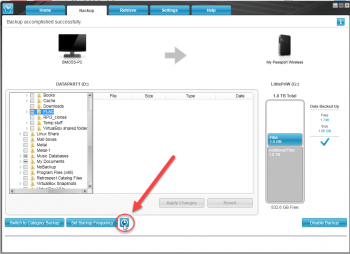
If your music tracks are stored on your PC, you could just use the backup utility which comes bundled at no cost with the WD WiFi hard drive.
- here is a short YouTube video which illustrates the WD backup utility, and also shows how to obtain & install it
- ignore the discussion regarding:
- the backup copies will be placed on the WiFi drive, out of harm’s way in a folder named WD SmartWare.swstor
- the drive has a builtin computer, which will serve up your tracks from a more meaningful location, as we will see in the following step
collapse
Rerun your chosen sync process whenever you have a significant change to your music collection .. updates will run much faster than the initial load up.
Tip: it is probably a good idea to start by just copying an album or two … and then configure AlbumPlays (next step) … and publish a test AlbumPlays playlist to the USB target, and make sure that everything is configured correctly, and is working well
Configure AlbumPlays for a USB playlist target
To configure AlbumPlays for your USB drive we need three pieces of information.
-
the common path root for the master copy of your tracks
We discovered this in the first section
For the purposes of illustration I will use C:\Users\Public\Music as an example. -
the USB replacement USB root path, showing where your mobile device will find the copies of your tracks via USB or WiFi
The discovery method depends upon how you will attach to the drive from your mobile device:WiFi connect: the manual to your drive will document it’s default IP address and the name of the folder where uploaded content is made available.
Or connect to the device from a PC via WiFi, and browse it to find the published location for your tracks.
Or load an android application which can browse SMB shares .. X-plore File Manager is free. … attach the android device to the drive’s WiFi network … use X-plore to browse LAN … tap “+Add Server” … tap “Scan” .. tap the USB drive once it is found … and explore the file structure until you find your tracks … the location is marked on the following illustration
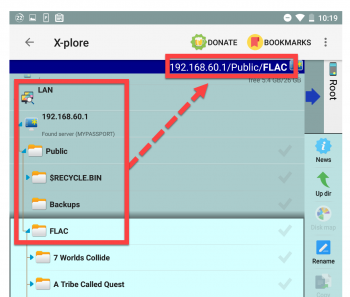
In the case of my Western Digital WiFi Passport device, I copied my collection to a folder which I named “FLAC“, and the drive publishes this at \\192.168.60.1\Public\FLACUSB connect: use Windows Explorer to find your music tracks
-
and finally, we need a path, as seen by the PC running AlbumPlays, where you will store the playlists on the mobile drive … ie. where AlbumPlays should publish the translated playlists when for playlists with a USB target
Attach the drive to your AlbumPlays PC using a USB cable, and Windows Explorer will show you the drive letter that Windows has assigned to the USB drive. Use Windows Explorer to create a folder for the AlbumPlays playlists … eg G:\MyPlaylists
Once we have these three pieces of information, we are ready to configure AlbumPlays for the USB device.
The configuration environment is introduced here. The playlist configuration options are documented here.
An example; if your three pieces of information are:
- common path root to your tracks: C\Users\Public\Music
- replacement root to your USC copies is: \192.168.60.1\Public\FLAC
- the USB directory you store the playlists is: G:\MyPlaylists
The configuration would be:
    [general section]
    _playlist_track_location_prefix_nas = C:\Users\Public\Music
    _playlist_track_location_prefix_usb = \\192.168.60.1\Public\FLAC
    _playlist_directory_usb = G:\MyPlaylists
This configuration would translate a playlist entry for:
C:\Users\Public\Music\Mary\Adele\25\Hello.flac
to this location:
\\192.168.60.1\Public\FLAC\Mary\Adele\25\Hello.flac
AlbumPlays would publish the playlist to:
G:\MyPlaylists
Divert the playlist to Dropbox
Where you use a AlbumPlays playlist, with a USB target, the USB drive will need to be mounted on your AlbumPlays PC whenever you publish or refresh the playlist.
You can configure AlbumPlays to divert the playlist to Dropbox when the USB drive is unavailable.
By default AlbumPlays will ask, offering to store a copy of the playlist(s) to Dropbox, if the USB drive is unavailable.
This default behaviour may be overridden by one of the following 3 diversion configuration settings:
- echo – always store a copy of the playlist to Dropbox
- fallback – don’t ask, store a copy of the playlist to Dropbox if the USB drive is not mounted
-
suppress – do not store a copy, and don’t ask either
[general section]
_playlist_usb_to_dbx = fallback
The intention of the Dropbox diversion facility is just to cover any occasions where you travel with your USB drive, but then find that you forgot to refresh the playlists on the drive.
I haven’t played with this too much. The following procedure is very kludgy, but it works. … Contact me if you devise something better.
the following are the steps required for the model of WiFi drive that I recommend; a WD My Passport Wireless
- connect your mobile device to the WiFi drive via what the drive’s User Guide calls a “Direct Connect” … ie. connect your mobile device to the drive’s WiFi network hotspot
- use your mobile to configure the drive to connect to the WiFi network available wherever you are staying … described in the drive’s User Guide as “Connecting to your Home Wi-Fi Network”
- your mobile can now see both the drive, and the Internet, where it can access your Dropbox account
- open the WD My Cloud app on your mobile device … you don’t need to create an account at Western Digital … just take the option to Connect to local device
- also open the Dropbox app on your mobile device … navigate to the the \Apps\AlbumPlays folder, at your Dropbox account, to find your diverted usb playlists
- select a playlist via the widget on the right hand side of the row, and select Export
- select My Cloud as the target
- Android will switch across to the open WD My Cloud app, open at “Downloads”, where you will see the playlist that you just exported
- repeat this multiple times, if you want to transfer more than one playlist
- in the WD My Cloud app on the mobile, long-press the exported playlist(s) to select it|them, and then use the top right three dots menu to take the Copy option
- select MyPassPort from the pop-up menu, and open the drive’s folder where you store your playlists, and press the check option at top right
- your playlist(s) will now be on your WiFi drive
- open the application which you use to play music from your WiFi drive …. it won’t be in too much of a hurry to respond to you, as the drive will be rebuilding its indices to include your new playlist(s) … you may get timeout messages from the drive
- have a beer, or go for 5 minute walk … while repeating “I must remember to prepare the drive before leaving home”
- once the re-indexing is complete, the drive will respond, and your playlist will be available
collapse
If you want your USB playlists echoed or diverted to your Dropbox folder, you need to pre-authenticate AlbumPlays to publish to a sandbox in your Dropbox account.
Dropbox authentication
Dropbox authentication is a little messy at the moment. The only way to authenticate AlbumPlays to Dropbox is via the Application Backups facility.
Take menu option Action|ApplicationBackup
- type 1 for Levels if you haven’t already configured AlbumPlays Backups
- press the Authorise button, and follow the procedure described as described in the link above
USB advice & hints
Which size WiFi drive should I buy?
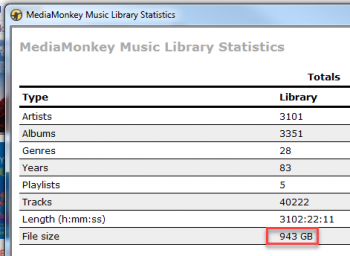
MediaMonkey can display the size of your music collection: File|CreateReports|Statistics.
This shows that my collection is 943gb, which is almost 1tb.
You need to allow space for the drives operating system and overhead, say 200mb. Also allow capacity for collection growth, plus any other files that you may backup to it.
I bought the 2tb model.
Which manufacturer?
I have tried two manufacturers; Seagate & Western Digital. From this limited sample my recommendation is:
- buy Western Digital
- avoid Seagate
This recommendation is based upon two factors:
- firstly there is what I have seen described as the dirty secret of WiFi hard drives. It is that the storage space may be vast, but their embedded computer chip is feeble. This may be good as far as cost & battery duration goes, but it takes them forever to index a large collection.
- secondly the Seagate product seemed to want to re-index each time the drive was turned on, regardless of whether there was any new or changed content.
The combination of these two factors made the Seagate a poor choice for me. It took over an hour to index 40,000 tracks (ie. just 1tb on a 2tb drive). This was a one hour delay, before I could use the drive(!!), each and every time I powered the drive on. The device was fine if I left it running.
I went to the Seagate community support forums, where other customers also complained of the same issue. Neither customers, nor Seagate, were able to resolve the problem.
I also went through Seagate support channels. They were not across the problem, but did replace the drive. The new drive had exactly the same problem. …. My conclusion was that the Seagate drive was only suitable for small collections, ie. where the re-index task runs relatively quickly. … Also it looks like Seagate have now closed their Community Forums, which is not a very encouraging development.
I bought the Western Digital device. It also takes a long time to initially index the whole collection, but only needs to do it once. WD are confident enough in their support story to retain a Community Support forum.
collapse
- I bought the WD My Passport Wireless
- there is also a new model named the MY Passport Wireless Pro
- the new model is larger, heavier, more expensive, and has better battery life
- for my needs, smaller, lighter, and less expensive were better … I use it for playing music when staying away from home, so I can plug it into a power point, making battery life a non-issue
- the new pro model does have a couple of other distinguishing features, but as I don’t own one I can cover them authoritatively
Using the WiFi drive
-
if you power up the drive by connecting it to your PC or NAS, via a USB cable, it operates as a simple slave hard drive. The PC or NAS controls the drive, and the drive’s computer does not boot up. … Use this mode when syncing tracks to the drive. You can also use this mode to play music using a laptop PC if connected via a USB cable.
-
if you power up the drive, when it is not connected to computer-like device, the drive’s own computer boots to control it, and the drive will become a WiFi hot spot.. … Use this mode when playing music using your phone, tablet, or a laptop connected via WiFi
When the drives boots up, it will automatically detect and index any new content.
Get the drive’s User Guide from here:
- section 5 shows how to connect your mobile device to the drive’s WiFi Network … nb: if you also want to use the Internet while listening to music, and an Internet WiFi connection is available where you are staying, you can configure the drive to join that Internet connection, and optional privacy options are available to secure your data from public access
- section 8 shows how to play music from your collection … you need a media player on your mobile device (ie. your phone, tablet, or laptop)
I have the following:
- Nexus 7 tablet
- Sony MDR-1ABT Bluetooth headphones superb sound, 30 hour battery, and comfortable for long listening sessions
- BubbleUPnP for DLNA – an android media player
- Simple Last.fm Scrobbler – to scrobble my mobile plays to Last.fm
Tips
-
avoid frustration by testing the drive before leaving home, especially if you have synced new tracks to the drive since you last used it …. attach the drive to your PC via usb … open AlbumPlays, and refresh the drive’s playlist (Action|AlbumPlaysPlaylists, unless the playlist is set to auto, in which case you only need to Open & Close AlbumPlays) … eject the drive from the PC, and boot it up … allow it to index any new material … test it by playing a track or two
-
even though the drive is a portable device, remember that it is a spinning hard drive … so don’t knock or move it while it is operating
-
remember that the drive computer is feeble … if it is (slowly) doing something, it is best to be patient, and wait until it completes, before adding new action into the mix
-
always eject the drive, before unplugging the cable, after you have been using it as a USB slave drive connected to your PC .. either use the the (1&2) WD Quick View icon in the PC’s notification area, or use USB icon … if Windows won’t release the drive review the following advice from WD

back to: AlbumPlays playlist overview and index
back to: Full index to User Guides
