This page covers the configuration wizard for the Observation & Detection part of the Spy application which was discussed and installed here.
The first time that you run this component it will create and initialise your persistent configuration file.
- Persistent configuration file
- This is the file which configures the AlbumPlays’ Spy component. It is “persistent” in the sense that it is not overwritten by any upgrade, nor by a re-installation of the application. Its file name is MySpy.ini.
- The configuration file is not installed by the install procedure, but is created by running the application the first time. It will then be accessible for manual update via the shortcut named “Configuration (MySpy.ini)”. Further documentation of configuration options is available here, and more via the AlbumPlays shortcut named “Spy Configuration documentation”.
Start the application via the Sonos Spy shortcut created by the install program.
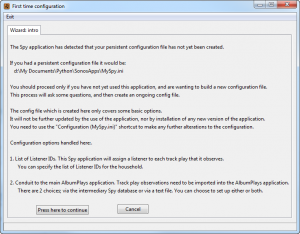
If you have no persistent configuration file, you will be greeted by a dialogue box that looks something like this:
As described on the screen shown above, the persistent configuration file created by the wizard will cover just the basics to get you started. These are:
- the list of people whose plays you want to track
- the location of a folder where this component can communicate with the main AlbumPlays application, as that may be running on another computer
- the conduit through which Spy observations will be transferred to the main AlbumPlays program
List of Listeners within the household
see here for an overview of the multi-user facilities within this application
This wizard will collect your Listener IDs. Each Listener who you wish to track needs an ID. It doesn’t need to be the person’s Last.fm account name; it just needs to be something unique, eg. their first name, their nickname, or their initials. The ID must not contain any embedded blank spaces.
You may also assign a catch-all ID to cover any untracked people who may use your Sonos equipment.
Follow the wizard’s instructions to enter the list of Listener IDs. It is easy to add more later. Then press Next to proceed to the next step.
It is important that all of the Listeners be also enrolled in the main AlbumPlays application, using identical IDs to those which you used here.
At this point Listeners are not assigned to Sonos zones, as this outside the scope of the wizard. Initially all Spy observations will be assigned to the first Listener mentioned in your list.
Communication with the main AlbumPlays program
The main AlbumPlays program may be running on another computer, so you need to provide the path to a folder which is accessible by both programs.
This Spy component will be use the directory for the following purposes:
- to output a menu file, so that you can control the Spy component via a browser on your main computer, as it is possible that the Spy comonent may be running on a small Linux device with no permanent screen or keyboard of its own.
- to export a copy of the log file, so that you can view Spy operation using your main computer
- somewhere to export the Spy track play observations, so that they may be used to update MediaMonkey, and/or scrobble to Last.fm
Follow the on-screen instructions to select a suitable location which is accessible, and can be updated, by both parts of the application. This can be anywhere if all components are running on the same computer, otherwise a NAS share is a suitable location.
Build the SPY transfer database
It is recommended that you use a Spy database as your main conduit to transfer track plays observations to the main AlbumPlays application.
The database method is the recommended approach as it is the easiest to use. The text file approach requires an Export step, whereas the database is accessible by both components, and is always up-to-date. It is recommended that you also set up the text file conduit as a backup to the database.
The database is optional. If created it is additional to the both the MediaMonkey database and to the main database used by the AlbumPlays application.
Take great care if you are asked for permission to overwrite an existing database. Make sure that you haven’t mistakenly used the same file name and location as your main AlbumPlays database, ie. the one which you created during the configuration and seeding process for the main application program.
The default location for the Spy transfer database is the directory you nomiminated in the previous step, although this can be overridden. Confirm, or override the default database location, and provide a name for the database.
Transfer via a text file
This is the alternate, or additional, option to transfer track play observations to the main AlbumPlays program.
It is recommended that you set it up, as a backup, even if you have created a Spy transfer database.
All you need do here, is set the radio button describing whether or not you wish to output Spy observations to the text file. The text file Spy observations are obtained by the main AlbumPlays program as described here. When they are exported, they will be written to a location known by the main AlbumPlays program, which is in directory nominated in the first step of this wizard.
Confirmation
You are then presented with a summary of your specifications. Review the list, and OK press the appropriate button. Otherwise select one of the earlier wizard tabs, and correct your entries.
Actions performed by this configuration wizard:
- create your persistent MySpy.ini configuration file. The application will make no further updates to this file. You need to make any further changes manually, using the shortcut provided. The option settings are described here.
- if requested, will create your Spy transfer database file
- the Spy component of the Spy application will be started, it will locate your Sonos zones, and start logging your track plays
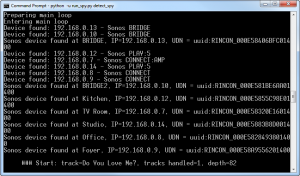
The black screen shows the wizard’s log file. If you created a database, towards the beginning there should be a line like:
>>> Creating NEW DATABASE: //<the database path that you specified>
The remainder of the log file shows the Spy component in action. if you are currently playing any music, it should end up something like this:
As mentioned elsewhere, Spy mode is more complex to configure than Last.fm mode, as there are more options. I have tried to simplify this via some recipes in the following Quick Start guide.
next step: Quick Start guide for Spy mode
back to top: Last.fm mode index


