This topic is applicable to Sonos owners only.
This is the fourth and final stage of the assisted install option for your Raspberry Pi. The first step can be found here.
This stage covers some wrap up jobs; some convenience functions, and some security functions to protect your database, and to protect your Raspberry Pi against hacker attack.
Index:
- Cause AlbumPlays to autostart
- Control & Observe from Windows
- Set your local timezone
- Change your Raspberry Pi password
- Change your Raspberry Pi network host name
- Create a backup copy of O&D component and the RPi environment
- Send yourself an alert email if track play observations cannot be stored
Cause AlbumPlays to autostart whenever the RPi is rebooted
The Raspberry Pi module of AlbumPlays needs to be already running whenever you listen to music on your Sonos system.
It is likely that your Raspberry Pi has neither screen nor keyboard, so it is best that your Raspberry Pi is kept running the whole time, and that it autostarts AlbumPlays each time that it is powered up or rebooted.
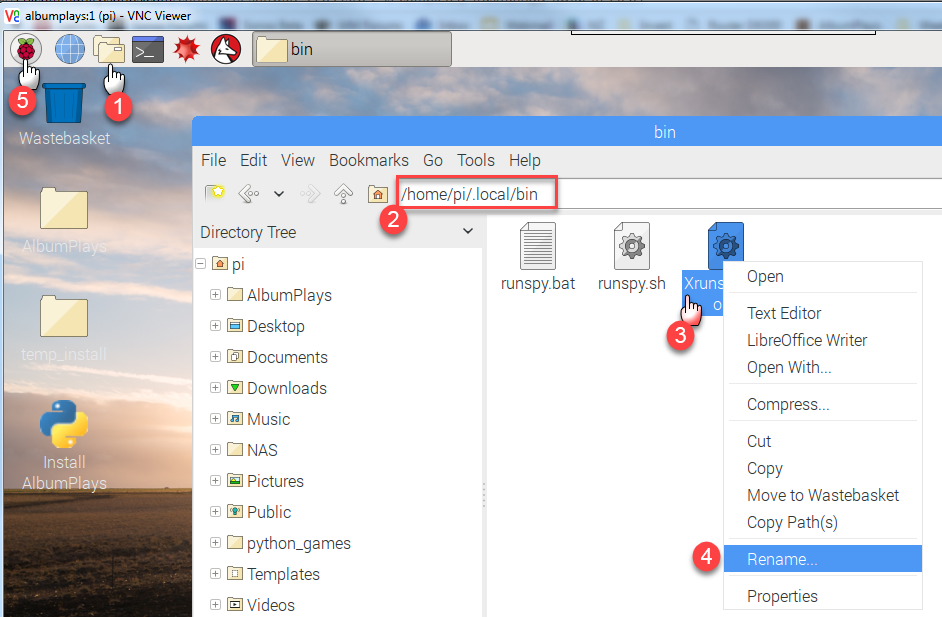
- step #1: on the RPi, open the File Manager (ie their Explorer) by clicking the folders icon on the toolbar at the top
-
step #2: navigate to the following directory … nb. Linux hides the .local directory; the File Manger will open at /home/pi … either type the whole path as shown below, or add /.l … so that it now reads /home/pi/.l … and then use the arrow and tab keys to complete your selection, then press the Enter key to navigate to it
/home/pi/.local/bin
-
step #3: right click the file named Xrunspy_auto.sh … this opens a pop-up menu
- step #4: select Rename, and remove the leading X, so that the file name is runspy_auto.sh
- step 5: reboot the the Raspberry Pi, and verify that AlbumPlays has auto-started … hint: the following section shows how to control and observe the Raspberry Pi from your Windows PC
collapse
Controlling and observing the Raspberry Pi from your Windows PC
One of the greatest advantages of choosing to run the AlbumPlays Spy component upon a Raspberry Pi, is that it reliably just runs and runs, without need of attention. But there are some exceptions, where you may want to interact or peek inside:
- you want to close it down, or reboot it … if you are using the database transfer option, you should protect that database by closing down AlbumPlays before turning off the Raspberry Pi, or rebooting
- or you want to check whether AlbumPlays is running, or has successfully detected all of your Sonos zones … your current Sonos plays will be lost if the AlbumPlays Spy component is not running, or it can’t see your Sonos zone for some reason … this is useful following a Sonos software update
- or you experience a problem within the Spy module … in which case you need to put the Rasberry Spy ito debug mode, or get the info & error logs, so that you can send them to me
- or you are using the text file transfer method for fresh play observations, or some communications problem has lost some plays from the transfer *database … you will need to trigger the Raspberry Pi to transfer the fresh observations to your PC
You access the Raspberry Pi Remote Control Menu via a link, which is sent to the transfer location that you specified during install of the Spy module, or manually reconfigured with the Spy module’s _nas_path configuration option.
The file name of the control menu link is sonos_spy_menu.html. The menu is rewritten each time the Raspberry Pi is rebooted. It always has the same name, so you may create a desktop shortcut pointing to that file path and file name.
See here for detailed instructions regarding Spy Remote Control menu facilities.
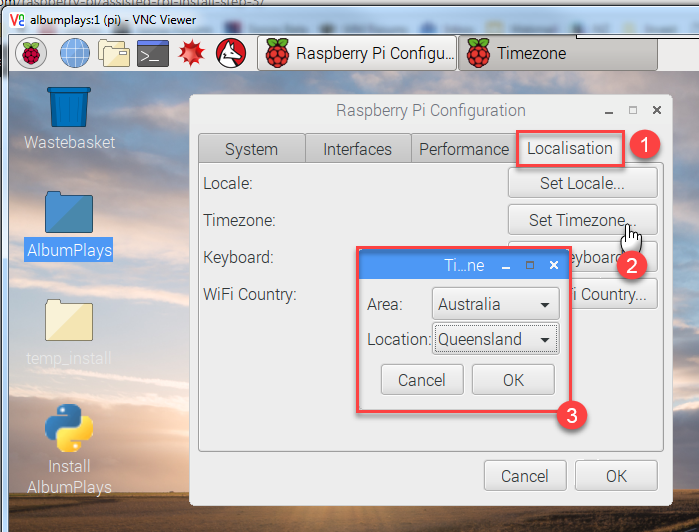
Set your local timezone
Configure your Raspberry Pi so that your track plays are recorded using your local time zone.
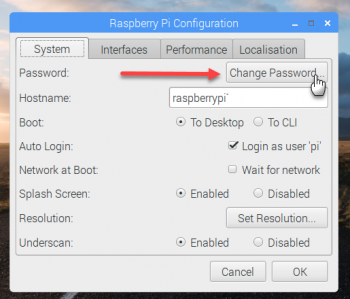
Change your Raspberry Pi password
Your Raspberry Pi will appear on your local network as RASPBERRYPI, and its password is albumplays.
The Raspberry Pi device is an example of the “Internet Of Things”; a massive exponential growth of devices which attach to the Internet. Any of these could be targeted by hackers, and you should not be one the 15% of users, who do not change their default password. .. A hacked Raspberry Pi in your network endangers more than just your track play history.
The Raspberry Pi is an extremely successful example of the “Internet Of Things”. It is currently the third best-selling “general purpose computer” ever, behind Apple Macintosh and Microsoft Windows PCs. This means that the default password for each Raspberry Pi is known to everyone.
AlbumPlays has already taken a small step towards securing your Raspberry Pi, as it has changed its password, from the default of “raspberry“, to “albumplays“.
You should change this to a personal password.
Change your Raspberry Pi network host name
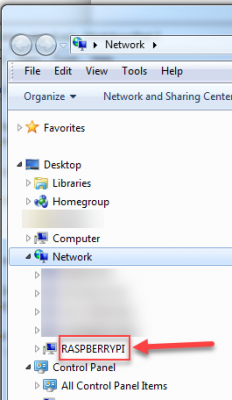
You can change the Raspberry Pi hostname from the default of *RASPBERRYPI”. This could be useful if you have more than one Raspberry Pi to add to on your network, or you want rename it to something which better describes its function.
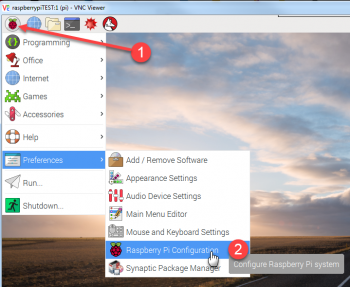
- click on the raspberry icon, top left, and take option “Raspberry Pi Configuration
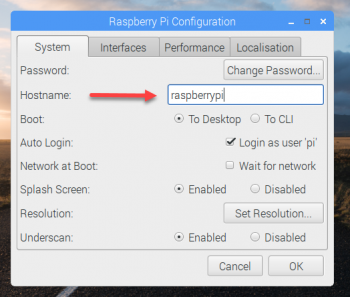
- change the hostname, and then press OK
- you will then be asked for permission for the Raspberry Pi to reboot itself … press Yes
- I changed my hostname to albumplays … as you can see in the following diagram, after rebooting, the Raspberry Pi is now called ALBUMPLAYS in my network, but I can no longer access it using Explorer from my Windows PC
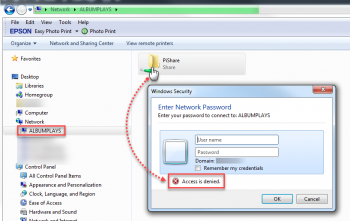
- you fix this via a configuration change on the Raspberry Pi
-
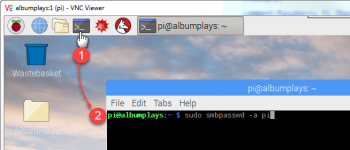
… as shown in the above illustration, click on the Terminal icon on the Raspberry Pi toolbar, and then type the following command into the Linux Terminal window is opened for you
sudo smbpasswd -a pi -
the Raspberry Pi will ask for your RaspBerry Pi password twice … nb: the RPi does not echo back any confirmation as you type the password characters; ie. you get no * characters
- the next time that you try to open your renamed Raspberry Pi from Windows, you will receive the same authentication challenge, but this time a User Name of pi and your RPi password should provide access
collapse
Create a backup copy of O&D component and the RPi environment
You should make a bootable copy of RPi SD card, ie.:
- the RPi Operating System
- the AlbumPlays O&D component, and its database
- all of your configuration
- ie. everything 🙂
- Buy a microSDHC with adapter sleave, having at least 8gb
- plug the card into a USB SD card reader
- on your Windows PC, format the card to FAT (see “How to format an SD card as FAT” here)
- eject the USB card reader, and then plug it into a USB port on your RPi
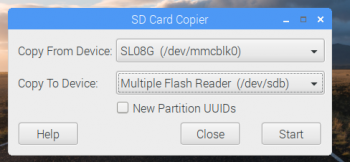
- press the Raspberry icon, at the top left of the RPi screen
- take menu option Accessories|SD_CardCopier
- more details about use of the Card Copier utility here (roll down to “SD Card Copier“)
collapse
How to use the clone SD card:
- power the Raspberry off
- replace the current SD card with the backup copy
- power up the raspberry Pi
Configure RPi to send an alert email if problems arise
You can configure the Raspberry Pi to send yourself an alert email if some problem stops it from storing track play observations. It will also send you a confirmation email each time the Spy O&D is restarted or terminated.
You first need to configure the Play Counts module of AlbumPlays with email credentials as described here
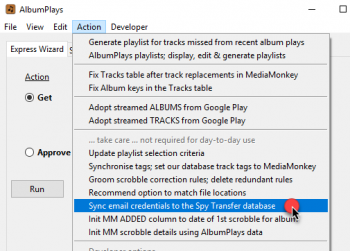
And then you need to transfer the encrypted email credentials to the Spy Transfer database on the Raspberry Pi.
And then, since the Raspberry Pi is unattended, you need to supply it with the encryption phrase that you used to encrypt your email credentials, as described here
Then use the raspberry Pi Control Menu to reboot the RPi.
Verify that all is configured OK by checking to make sure that you received a “start-up” email from the Raspberry Pi Spy O&D module.
collapse

