- there is no requirement that you have Sonos equipment if your use Last.fm mode. Last.fm mode delivers most of this application’s benefits.
- Spy mode is for Sonos owners only. It handles both your Sonos and your non_Sonos plays
collapse
The short answer is:
- This application never directly updates your tracks.
- In LFM mode (where you get all your scrobbles from Last.fm) your tracks are never updated
- In SPY mode (where you build your own Sonos scrobbles, and scrobble them to Last.fm), this application can ask MediaMonkey to update your tracks tags with Last.fm tag corrections, but you have to approve & request this action on a track-by-track basis.
- This application does update play-related data into one of your MediaMonkey tables. It does not change the MediaMonkey database structure, and won’t impede you ability to accept MediaMonkey upgrades.
- This application takes two MediaMonkey columns, and uses them for purposes other than what the developers of MediaMonkey intended. These are the DVD-related fields for Season Number and Episode Number. With Music, this application uses these columns for last play date for the album, and album’s play count.
Your tracks
If you use this application in SPY mode you can optionally request that MediaMonkey update your tracks. The application will suggest a tag alteration, if it has noticed that Last.fm “corrected” a scrobble which you have submitted. You have to explicitly request that this correction be applied back to your track, on an individual correction-by-correction basis. You do this by altering the check-box alongside the scrobble correction in an action grid. The application would then pass the update details to MediaMonkey for action.
So your tracks are only updated in SPY mode, and only ever at your explicit request, and only ever by MediaMonkey, which you already trust for track maintenance purposes
MediaMonkey’s database
This application does update your MediaMonkey database, to supply track & album play-related data.
This application causes no change to MediaMonkey’s database structure, nor any of the database rules. It only updates data, in one MediaMonkey table. This means that you can apply updates to MediaMonkey without any impact to this application, unless a new version of MediaMonkey restructures their database in some significant fashion.
This application can update MediaMonkey in the following ways:
- Songs Table
-
the following columns are updated/:
LastTimePlayed – reset to new last played date
PlayCounter – reset to new value, ie. replaced, not incremented
SeasonNumber – this is a user-alterable column supplied by MediaMonkey to hold the season number for a DVD series – this application takes this column, for Music, to store the album play count
EpisodeNumber – this is a user-alterable column supplied by MediaMonkey to hold the episode number for a DVD series – this application takes this column, for Music, to store the date-last-play for the album
If you don’t want this application alter these last two columns, you can override this application’s default behaviour with the _mm_col_for_album_play or the _mm_col_for_album_last_play configuration options. This would cause this application to use some of the following columns. See the Configuration file documentation for further information.
BPM – this is a user-alterable column supplied by MediaMonkey to allow you to store Beats Per Minute information for the track – Available to be used for _mm_col_for_album_play
Custom1 through to Custom5– these are MM columns available for custom purposes, but they require an upgrade to the version of Sqlite contained in Python’s standard library. – Available to be used by either _mm_col_for_album_play or mm_col_for_album_last_play
- Played Table
-
This table contains individual scrobbles. These are not used by MediaMonkey, nor does MediaMonkey have any integrity checking for these. For these reasons AlbumPlays, by default, does not update this table, unless the default behaviour is modified by the following option.
This topic is further discussed here.
Why not use MediaMonkey’s Custom fields?
You need a version of Sqlite with Full Text Search facilities installed to be able to update these columns. The version of Sqlite which is installed with the Python standard library doesn’t include this feature.
I didn’t want to complicate matters for non-technical people beyond a simple install of Python.
You can change the default behaviour via the _mm_col_for_album_play or the _mm_col_for_album_last_play configuration options.
Example
[general section]
_mm_col_for_album_play=BPM
collapse
No, you do not have to seed your database.
| Seed from | Consequences |
|---|---|
| Last.fm | AlbumPlays can import all of your historic scrobbles from your LFM account. It matches the tags from your historic scrobbles against the current track tags stored in your MediaMonkey database. |
| . | AlbumPlays contains tools to do most of the leg-work and heavy lifting to achieve a matchup between your historic scrobble tags and your current track tags, but it can be tedious process if you have done a lot of retagging over the years, and you will not accept any scrobble loss |
| . | The AlbumPlays database on your PC retains full details of every successfully matched scobble. It uploads to MediaMonkey, either just the level of detail which MediaMonkey makes use of (date-last-played and play count for each track), or full details of every individual scrobble |
| . | During the seeding process you will build and retain a library of translation rules to automatically resolve ongoing Last.fm tag “corrections” to your future scrobbler submissions |
| . | The process may assist you to identify and improve any incorrect track tags |
| MediaMonkey | This option is only available if MediaMonkey has already your play history |
| . | Only play summary information will be retained – ie. number of plays, last play date |
| . | It is very quick and easy |
| No seeding | Play statistics start from today |
| . | Any prior play history in MediaMonkey will be discarded |
Seed from Last.fm
Just follow the documentation in the Getting Started section of this web site; this is the default setting, so there is nothing extra that you have to do.
Seed from MediaMonkey
Immediately after you have created your database take menu option Action|SeedThe DatabaseUsingMediaMonkey.
This option is only visible if your database is still empty of any scrobbles.
The procedure seeds this application’s database from MediaMonkey. Only tracks which have been played are imported in the AlbumPlays database. Any unplayed tracks will be automatically imported when you first play them.
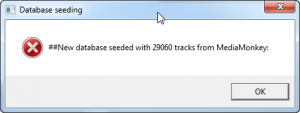
All going well you should see the following dialogue box.
Your first Get action will download scrobbles starting from oldest scrobble which was known to your MediaMonkey database, or as from today if there was a forward-dated scrobble stored in MediaMonkey due to some bug elsewhere.
Remember that the install procedure has initialised AlbumPlays with a limiter upon who many scrobbles will be downloaded by each *Get” action. Once you have satisfied yourself that communications with Last.fm are working OK, you need to remove this download limiter as described in the adjust quantity of scrobbles section of the FAQ.
Don’t seed your database; start from today
By default the application will start its Get action downloads, with your oldest scrobble. You can change this default behaviour by altering the MyScrobbles.ini configuration file.
Open the ini file via the shortcut that was installed with this application (nb: the ini file is not created until you run the application for the 1st time to create your database).
See here for more coverage of the AlbumPlays configuration file, and how to use it.
Find the ini file’s [get] section.
Add the following line
_when_limit_use_newest=Y
The _limit line, which should already be there, is also required. You should have something like:
    [get]
    _limit = 2
    _when_limit_use_newest=Y
save the ini, and then run a “Get” action. It should obtain your newest 200 scrobbles.
You can now delete (or comment out by inserting a cross hatch at the beginning of) each of the above two lines:
    #_limit = 2
    #_when_limit_use_newest=Y
Subsequent “Get” actions will just get your fresh scrobbles.
collapse
- tracks which I play with the Android or PC versions of MediaMonkey are scrobbled to my Last.fm account … they also update MediaMonkey’s record of my play history
- tracks which I play using my other music platforms, such as my phone, are scrobbled to my Last.fm account, but do not update my MediaMonkey database
-
I intend to fix this by using AlbumPlays to import my Last.fm play history into MediaMonkey
-
Will this mean that my MediaMonkey plays will become double counted, as they are already recorded in my the MediaMonkey database?
The short answer: No.
AlbumPlays has its own database. AlbumPlays has been designed to minimise contact and interaction with MediaMonkey. The aim of this design to allow you to take upgrades to either MediaMonkey, or AlbumPlays, without impacting the other application.
- MediaMonkey database
-
The master copy of your track data; tags, track ratings, etc
But only has rudimentary play history; usually it displays just track play count and date last played, not individual scrobbles. It has no record of plays made by music platforms other than MediaMonkey. There is no facility to redact unwanted scrobbles.
- AlbumPlays database
-
The master copy of your play history
It keeps details of all of your individual scrobbles, for all music platforms which scrobble. It has tools allowing fine grained grooming of your scrobble history, where required.
Last.fm does not capture the source of your scrobble submissions; ie. it doesn’t know whether they come from MediaMonkey, or some other device, such as your phone.
AlbumPlays regular processing cycle receives all scrobbles, and overwrites MediaMonkey’s version of all play history.
What happens if you play a track using MediaMonkey (PC or Android)?:
- the track play is immediately updated to MediaMonkey’s play history … this is a temporary record of the play … AlbumPlays will overwrite it later
- and the track play is scrobbled to your Last.fm account
Some time later, you will run AlbumPlays to obtain your fresh scrobble activity from Last.fm; it gets your MediaMonkey plays, as well as fresh plays using your other scrobbling devices.
AlbumPlays corrects ( aka overwrites) MediaMonkey play history for all tracks; ie every track, not just freshly played tracks
The important thing is that MediaMonkey’s play history will be correct if you ensure that AlbumPlay’s play history is correct:
- make sure that you have configured MediaMonkey to scrobble your track plays to Last.fm
- and chose whether:
- you want to seed AlbumPlays with your existing play history from MediaMonkey
- or whether you want to import your full play history from Last.fm
- or just want to start afresh with no history.
- and you need to use AlbumPlays in the recommended manner, to ensure that its view of your play history is correct:
- use its regular processing cycle to download your fresh scrobbles from all of your music platforms, which will include those from MediaMonkey
- create any rules, as needed, to translate any Last.fm scrobble “corrections”, which are impeding scrobble importation, due track tags which no longer match. The rules are retained, and are auto-applied whenever required by any future scrobble.
- use AlbumPlays to delete its record of any unwanted scrobbles
AlbumPlays will update MediaMonkey’s view of your play history, and will not duplicate track plays made using MediaMonkey itself.
collapse
The install procedure will have created shortcuts for two configuration related items. If you are using Spy mode, there will also be a second set of two items, as a Spy mode implementation may be partitioned across two separate computers.
See here for a description of LFM vs Spy mode
| Mode | Where to find things |
|---|---|
| LFM & Spy modes | LFM mode, and the “Play count processing” component of Spy mode |
| Runs on: your MediaMonkey computer | |
| Default config file name: MyScrobble.ini | |
| nb: see File|About menu for AlbumPlays file locations | |
| Desktop shortcut: Configuration (MyScrobble.ini) (see below) | |
 |
|
| User Guide for LFM mode configuration | |
| User Guide for Spy mode configuration – Play Count Processing module | |
| Shortcut to tech docs: Configuration documentation (see above image) | |
| “Documentation” file name: scrobbles.ini | |
| Spy mode | The “Observation & Detection” component of Spy mode |
| Runs on: either your MediaMonkey computer, or some other small computer which is always left running | |
| Config file name: MySpy.ini | |
| Shortcut to edit the file: Configuration (MySpy.ini) | |
| User Guide for configuration – Observation & Detection module | |
| Shortcut to technical documentation: Spy Configuration documentation | |
| “Documentation” file name: sonos_observer.ini |
- Configuration (MyScrobble.ini or MySpy.ini) – this is the file, or files, which contain your own configuration settings. The files themselves are not created until you use AlbumPlays for the 1st time. Each is created for you by a configuration wizard, after asking you a few questions to gather some basic configuration settings. They are persistent files, that will be neither overwritten nor updated by new releases of this application.
- Configuration documentation – These contain some further documentation for the configuration options. They are also configuration files, but anything here will be overridden by a setting in your own configuration files, and these “documentation” files are replaced with a fresh copy whenever you install a new version of this application. So you should use the other files for all of your local settings. Use these files just as a documentation reference, and as a copy and paste source
Any line which begins with a # is only a comment, as is not used nor read by the application. If the following line was in a configuration file it would treated as a comment only:
#_database=c:/My Documents/xxxxx/xxx.db
While the following line would configure your database location:
_database=c:/My Documents/xxxxx/xxx.db
All the configuration options start with an underscore character, as shown the line above.
The configuration wizards create just a basic configuration file to get you started. Any modifications need to be made manually, using the shortcuts documented above. To change your configuration you should copy and paste the relevant option line from the “documentation” file for the correct mode, into your configuration file, and then alter it.
You must make sure that you paste any configuration line into the correct configuration file for the mode being configured, and also into the same section from where you found it in the “documentation” file.
The default name of the configuration file for LFM mode may be altered by the -i command line option. Use of this option allows you to set up alternate installations of the AlbumPlays application, so that you can test and experiment, without endangering your scrobble history.
LFM mode, and the “Play Count processing” component of Spy mode
There are 5 sections to the configuration file. They are:
- [general section]
- [get]
- [massage]
- [crunch]
- [gui]
The documentation file covers both LFM mode and half of SPY mode, so not all options are relevant or valid in any individual mode. The “documentation file” mentioned above may contain more information than you need, as it also covers settings which just used internally by the application.
The best introduction to configuration of the main AlbumPlays application is described here:
Configurable items include:
- the location of things: databases, playlists, the transfer directory for communications between this module and the “Observe & Detect” Spy module
- whether the application is running in LFM or Spy mode
- LFM mode: whose LFM account do we download from?
- SPY mode: should we scrobble? for whom?
- SPY mode: how should non-Sonos scrobbles be handled?
- date and time display formats
- MissedTrack playlist: what gets included, and is it auto-run?
- date and time formats
- logging level
- which MediaMonkey columns can this application appropriate?
- which version of MediaMonkey are you using?
The “Observation & Detection” component of Spy mode
There are 2 sections to the configuration file. They are:
- [sonos_observer]
- [detect_spy]
Some configuration settings are just internally by the application. The configuration items that you are most likely to interact with are:
| Section | Option name and function |
|---|---|
| [sonos_observer] | _nas_dir ; default location for inter-component communications |
| [detect_spy] | _database ; file name , and optional override path, for the database transfer option |
| _spy_text_directory ; directory where the optional text transfer file accumulates | |
| _suppress_out_db ; turn off the database file transfer option | |
| _lfm_id_list ; list of Listener Ids | |
| _lfm_id_zones ; assign Sonos zones to a Listener | |
| _lfm_zone_default_id ; Listener ID to use with unassigned Sonos zones | |
| _out_text ; turn on the text file transfer option |
These options for this component are documented here, or you can use the search facility available from this site’s Home screen, otherwise use the shortcut to look in the “configuration documentation” file which was mentioned above.
For more general information about Windows configuration files see: http://en.wikipedia.org/wiki/INI_file
This application is written in the Python programming language. Python builds a help file which may be a handy summary of configuration items for advanced readers.
Locate the Working Directory for the application
Open the Command prompt, and change to the Working Directory.
The following command line displays the help file for the [general section]
python sonos_scrobbles/get_raw_scrobbles.py -h
The following command lines will display the help file for the [get], [massage], [crunch], and [gui] sections respectively:
python sonos_scrobbles/get_raw_scrobbles.py get -h
python sonos_scrobbles/get_raw_scrobbles.py massage -h
python sonos_scrobbles/get_raw_scrobbles.py crunch -h
python sonos_scrobbles/get_raw_scrobbles.py gui -h
collapse
“Fresh” scrobbles are downloaded from Last.fm (LFM) when you are running this application in the mode where the source is set to LFM.
The definition of “fresh”, is scrobbles which are new to this application, and are older than the scrobbles already obtained.
All fresh scrobbles will be downloaded, unless limited via the limit option in the [get] section of the ini MyScrobbles.ini configuration file.
The limit is expressed in the number of “pages” of scrobbles that are requested from LFM for each “Get” action. A page is usually 200 scrobbles.
When this application was installed, the limit was preset to 2 pages (= 400 fresh scrobbles).
Once you have determined that the application is communicating with LFM successfully, and is updating your MediaMonkey database as expected, you should increase this limit.
Use the shortcut installed with this application to open the MyScrobbles.ini file.
Alter the limit, or remove it.
You can remove it by deleting the line, or by commenting it out by inserting a cross-hatch as the 1st character on the line, for example:
#_limit=2 (ignored because of the opening #)
While you are seeding this application’s database, by obtaining your historic scrobbles, it is recommended that you maintain a limit of some kind, to avoid you, or this application, from being blacklisted by LFM. Your PC will also respond better if it has smallish sized bites to work with. The following setting would allow you to download 4,000 scrobbles per “Get” action:
    [get]
    _limit=20
Once you have completed the seeding task, you will most likely be dealing with much smaller quantities of fresh scrobbles, so it makes no difference whether or not you leave a moderate limit in place.
- Important: the _limit line is optional, but if it does exist it must be within the ini file’s [get] section.
collapse
Miles Davis was born on the May 26th, 1926. By default this application would display this date as 26/05/1926, and times are shown in 24 hour format. You can make some basic modifications to the display formats with configuration file settings.
See here for an overview of the configuration framework used by this application.
See here for a technical document listing the limited format codes which are available. nb: any % character needs to be doubled up.
Here are some date recipes which may meet your needs:
26/05/1926 (this is this application’s default display format for the above date, so an option setting is not required, but if it was supplied it would be):
[general section]
_locale\_date_format=%%d/%%m/%%Y
05/26/1926
[general section]
_locale\_date_format=%%m/%%y/%%Y
05-26-1926
[general section]
_locale\_date_format=%%d-%%m-%%Y
Formatting options for time display are even more basic.
21:50:00 (this is this application’s default display option for the above time, an option setting is not required, but if it was supplied it would be):
[general section]
_locale_time_format=%%H:%%M:%%S
21:50
[general section]
_locale\_time_format=%%H:%%M
collapse
- close AlbumPlays
- open the AlbumPlays folder which was installed onto your desktop or Windows Start bar, select the following option

-
update the configuration file as follows, save your update, and then re-open AlbumPlays
[general section]
_debug=Y
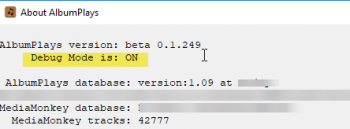
You can verify whether AlbumPlays is in debug mode via the File|AboutAlbumPlays display
collapse
The MediaMonkey database locks itself for a brief period, to protects its integrity, whenever you update MM to re-tag tracks or albums, or to add albums.
See here if you receive a message from AlbumPlays saying that the MediaMonkey database cannot be opened as it is locked.
collapse
MediaMonkey stores its database here.
You may wish to move MediaMonkey’s database to the same location as the AlbumPlays database, to make it easier to backup both together.
If you do move the MediaMonkey database, from its default location, you need tell AlbumPlays where to find it. You do this as described at the bottom of this section.
collapse
There are several references in this web site to AlbumPlay’s “working directory“. This directory can be difficult to locate as Window’s default configuration is to hide directories of this type from those which you may browse with Explorer.
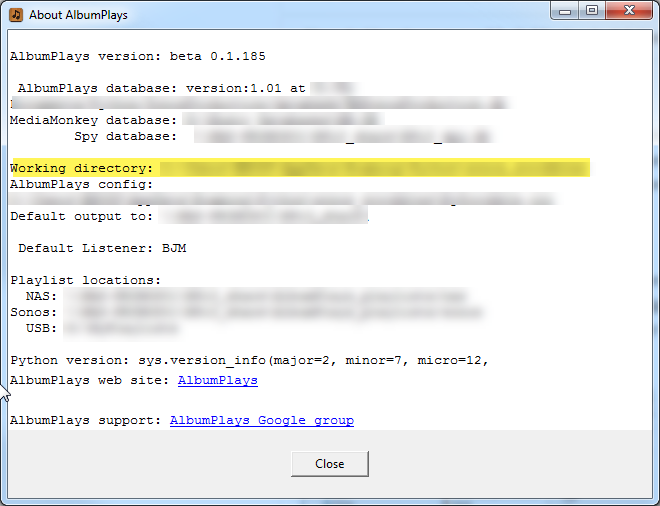
The location of the working directory is listed on The “About” screen for AlbumPlays, which is available via the File|AboutTheAlbumPlays Application menu item
The location is also displayed in the log file. Take the option File|ShowInfoLogFile, and look for the following line:
or
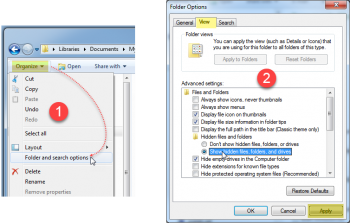
You may need to alter the following Windows configuration setting so that you can browse to the working directory using Explorer. In Windows 7:
- open explorer
- Select Organize and then Folders and search options
- select the View tab
- and select the Show hidden files, files and drives radio buttom
- Press Apply
collapse
You can set up a test environment to allow you to experiment, without causing any affect to your scrobble history at Last.fm or to your play counts in MediaMonkey.
This test facility does use the same version of AlbumPlays as your production version, but has its own database and configuration file. It can also be pointed to alternate test Last.fm account, or scrobbling can be turned off for this test installation.
Optionally you may also use a parallel test installation of MediaMonkey for your test environment. This is not essential because AlbumPlays is the master copy of your play counts and play history. Each Approve action in AlbumPlays resets all of MediaMonkey’s play count and date last played columns to the AlbumPlays view of things. This means that anything that you do in the test environment will be reset by the next Approve action within your production version of AlbumPlays.
You will want to install a test version of MediaMonkey if you are needing to re-tag, add, or delete tracks for your test. This approach also allows you to run tests using a subset of your music collection. … Installation of a test version of MediaMonkey is easy to achieve, so you may want to do this just as a precaution.
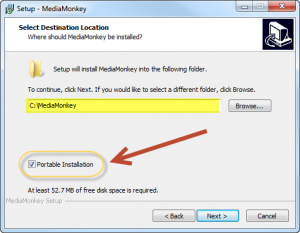
To install a test version of MediaMonkey, you run their installation program, and select a portable installation as shown below. This mode of installation will install MediaMonkey, and its database, entirely within the directory that you specify; ie. it is portable in the sense that you can install it on a thumb drive, and then take it away to use on another computer. So specify a directory that is part of your test environment, and this will not disturb your main MediaMonkey database.
The steps to create the test environment for AlbumPlays are:
- create a renamed copy of the MyScrobble.ini file … your alternate ini file needs to be in the same directory as the main ini file
- for the purposes of this example, let’s imagine that you name the copy as MyTestScrobbles.ini
- remove the database option line (_database) from your alternate ini file, and save the file … *this is important* … delete the line, or put a # in column 1 of that line
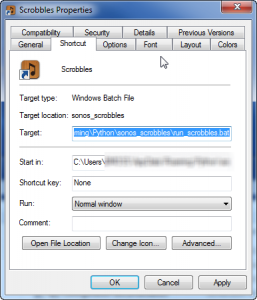
- locate the batch file which runs AlbumPlays by examining the desktop shortcut which you use to start AlbumPlays … look at the Properties of the desktop shortcut … the batch file is named in the Target box
- create a renamed copy of the batch file in the same directory as the main copy
- locate and change the following line in the renamed batch file
-
**change:** python -u execute_scrobbles_gui.py gui **to:** python -u execute_scrobbles_gui.py gui -i MyTestScrobbles.ini -
create a renamed copy of the shortcut that you use to start AlbumPlays … set its target to your modified bat file
- start AlbumPlays using this alternate desktop shortcut
- AlbumPlays will go through its first time configuration routine (because there is now no database location specification) … use the configuration routine to create a test database … it is critical that you don’t specify the same name as your production database, as this will prompt you to delete your production database, which would cause you a lot of grief
-
if you created a test installation of MediaMonkey, you should then open your alternate ini file for AlbumPlays, to make sure that your test environment is pointing to the test version of MM. The General Section of the ini file needs to contain an entry for _MM_db_path pointing to your test MediaMonkey database, eg:
    [general section]
    _MM_db_path=C:/xxxx/MediaMonkey/Portable/MM.db
Hint: you can seed a new AlbumPlays test environment with play history, if you have a pre-existing test database for MediaMonkey or are using your production MediaMonkey database. Follow the seed from MediaMonkey instructions.
collapse
SONOS owners only
The answer to this question depends upon whether you are using this application in LFM mode, or in Spy mode.
See here for a description of LFM mode vs Spy mode.
In LFM mode you would really be loading a different listener, rather than another listener, as LFM mode doesn’t accommodate multiple listeners (see here for an explanation of the multi-user capabilities of this application). This application hasn’t anticipated that you would want to do this. You should contact me, so that we can discuss what you are trying to achieve.
Spy mode does have some multi-user capability. See here for a discussion of the limitations. See here for instructions showing how to create and modify Listeners.
collapse
Using the Sonos desktop controller:
Press the Music button
Then in the 3rd column, Click on Last.fm and then “Scrobbling (On)”, and follow the instructions.
Using the android controller:
Press “Sonos” at the top left, then select Last.fm, and then “Scrobbling (On):, and follow the instructions.
collapse
The quick answer is that both should be used.
“Transfer” here refers to sending track play Spy observations, from the “Observation & Detection” component, to the main “Play Count Processing” component. This is only relevant in Spy mode.
There are two Spy transfer conduit options:
- via a transfer database
- via an exported text file
The recommended primary conduit is the database option. It is recommended as it easier to use, because the database will be fully up-to-date whenever the “Play Count Processing” component wishes to use it, whereas the text file option requires a prior Export step.
The Observe & Detect and Play Count Processing components may be running on two independent computers. The database will be at a location accessible by both components, eg. a NAS. On the other hand, the text file is located within the computer which is running the “Observe & Detect” component. The text file method may be more robust, as no LAN communication problems can arise which would disrupt collection of the Spy observations.
It is recommended that you set up the text file option, as a back up to the database conduit. If communications with the database become disrupted, Spy observations will silently cease being added to the database. If this occurs you will suffer no loss, as the there is a procedure to obtain the missing plays from the text file.
See here for a description of the set up wizard where the transfer conduits are set up.
See Observe & Detect transfer configuration options; where to store SPY data ready for transfer
And Play Count Processing transfer configuration options; if you want to make the text file your primary tranfer conduit
collapse
The Spy module can be installed so that it is automatically started whenever you restart your computer.
You may turn this facility on by reinstalling the second part the Spy module, ie. run the file named sonos_spy_x.x.xx.exc (the the x’s are the current version number)
Re-installation will not disturb your other configuration options.
Rerun the installation, taking the following option:
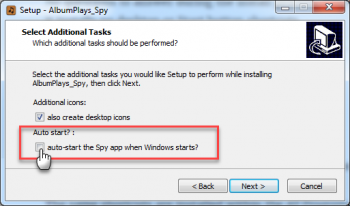
Then re-start your computer.
collapse
Spy mode has an option which uses a transfer database to send fresh Sonos track play information from the “Observation & Detection” component, to the main AlbumPlays module.
This transfer database is prone to corruption if mistreated (see below). If this happens AlbumPlays will not be receiving your fresh Sonos plays; ie. they are not being updated into MediaMonkey, and where you use AlbumPlays for scrobbling, they are not being sent to Last.fm.
Corruption has happened to me just twice over the 6 years that I have been using AlbumPlays in Spy mode, in which time it has successfully handled 150,000 of my Sonos track plays.
If the database becomes corrupted, the fix is very simple. You just need to delete a single file, and if you have taken the recommended setup options, no tracks plays will be lost.
Symptoms of corruption
nb: you can configure the Spy O&D module to send you an Alert email if a problem develops … details here
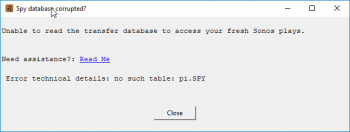
If you are using the database transfer option, and your database becomes corrupted, you will receive the following error message during a Get action run while the Source radio button is set to Spy.
Another indication that the transfer database has become corrupted is if you see something like the highlite section in the following image from the Recent Track Starts menu option of the AlbumPlays – Observe & Detect menu
Fixing the corruption
-
Stop the Spy component. Usually the best way to do this is via the AlbumPlays – Observe & Detect menu, using the Close down the O&D module menu item … but since the transfer database is already corrupted, you may just unplug the Raspberry Pi from the power, or close the Spy application if you are running it on your PC.
-
Delete the corrupted database. The database location is as described by the _nas_path and _external_spy_database options in main AlbumPlays configuration file … but the easiest place to discover the db location is via the File|AboutAbumPlays menu option, where the database location is described as Spy database
-
Then reboot the Raspberry Pi, or restart the Spy component.
Recovering any lost track plays
If you took the default installation options, all of your track plays will have been recorded by the text transfer file.
Follow this procedure to recover any lost Sonos track plays.
Avoiding corruption of the transfer database
The most common cause of corruption of the transfer database is from rebooting, or powering off, the computer running the Oberve & Detect module, without first closing down that program. The proper way to do this is to use either of the shutdown options on the AlbumPlays – Observe & Detect menu
collapse
